
Configuring an OLT GPON system is not just about enabling ports—it involves carefully designing how bandwidth, authentication, and services are delivered across the fiber network. A properly configured OLT ensures stable connectivity, minimizes packet loss, and supports long-term scalability for FTTH and enterprise deployments.
In this guide, we expand each step to clearly explain how to configure GPON OLT, with detailed insights and practical recommendations for real deployments.
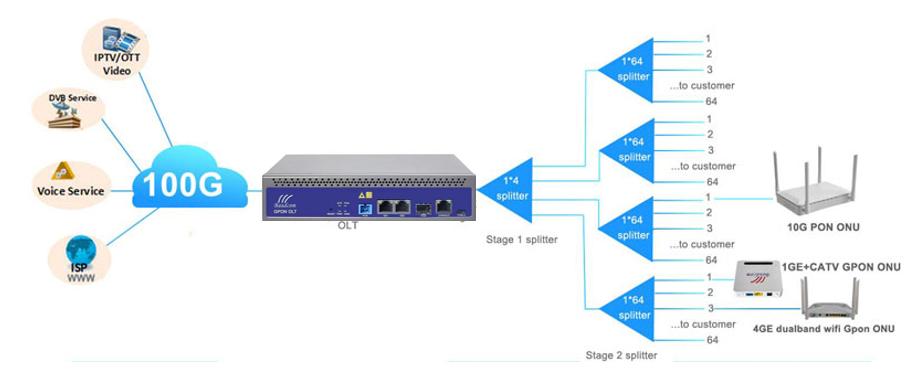
Why We Need to Configure GPON OLT?
A GPON OLT (Optical Line Terminal) is the central control point of a fiber access network, but it does not function properly “out of the box.” Without configuration, it is essentially just hardware with optical interfaces but no defined service logic.
Configuration is necessary because the OLT must coordinate multiple critical functions simultaneously, including user authentication, traffic forwarding, bandwidth distribution, and service isolation.
Proper configuration ensures:
- Controlled service delivery: The OLT needs rules to determine which user receives which service (Internet, IPTV, VoIP). Without configuration, all traffic would be unstructured and unusable.
- Efficient bandwidth utilization: GPON networks are shared. Configuration defines how upstream and downstream bandwidth is allocated fairly among multiple ONUs using DBA mechanisms.
- Secure network access: Authentication rules (SN/LOID binding) ensure only authorized ONUs can join the network, preventing unauthorized access or service theft.
- Traffic separation and stability: VLAN configuration isolates different services and customers, preventing broadcast storms and reducing interference between services.
- Scalability for future expansion: A well-designed configuration allows operators to easily add new users, services, or even entire network segments without redesigning the system.
Without proper GPON OLT configuration, even high-end equipment will suffer from instability, inefficient traffic handling, and frequent service failures, especially in large-scale FTTH deployments.
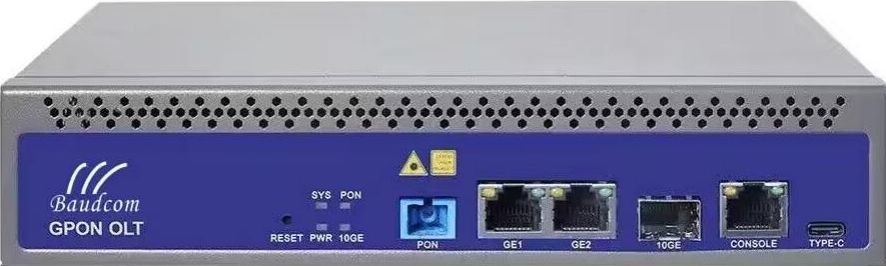
GPON OLT Configuration Step by Step
1. First Access: Management IP
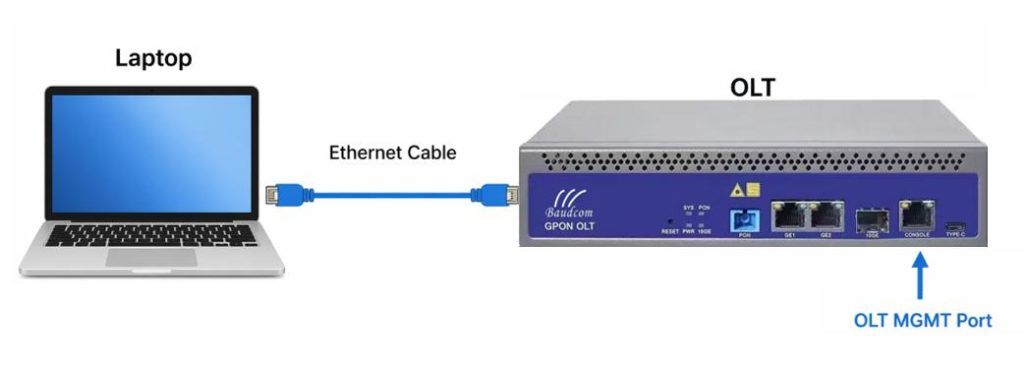
Before you can type a single command or click a button in a graphical interface, you need to physically establish a connection between your computer and the OLT.
Most OLTs feature a dedicated MGMT or AUX Ethernet port that is completely separate from the data-forwarding ports. This port typically comes pre-assigned with a default static IP address from the factory, such as 192.168.1.100 or 192.168.8.200. To use this method, manually set your PC’s Ethernet adapter to an IP address in the same subnet (for example, 192.168.8.200), then connect directly to the management port using a standard Ethernet cable. From there, you can open a web browser to access the OLT’s HTTPS interface or use SSH for command-line access.
Security Tip: Immediately change all default passwords as soon as you log in for the first time. For CLI-based OLTs, you should update both the standard admin user password and the enable password (which grants privileged configuration mode). Leaving default credentials in place is one of the most common security vulnerabilities found in newly deployed GPON networks, as attackers can easily look up default passwords online.
2. Basic OLT Configuration (Management & Access)
Once you have successfully logged into the OLT, your immediate goal should be to set up In-Band Management. In-band management allows you to control the OLT remotely using your regular data network VLANs rather than being physically tethered to the dedicated management port.
Step 1: Create Management VLAN
Create a dedicated VLAN that will be used exclusively for managing the OLT and any future ONUs that need remote administration.
Explanation: By isolating management traffic to its own VLAN (for example, VLAN 100), you prevent regular customer data traffic from reaching your OLT’s control plane. This separation enhances both security and performance, as broadcast storms from customer VLANs will not affect your ability to manage the device.

Step 2: Configure Uplink Ports
Set your uplink port (for instance, GE 1/6/20, which is typically the first Gigabit Ethernet port) to trunk mode and explicitly allow the management VLAN to pass through it.
Step 3: Assign Management IP
Assign the IP address to the VLAN interface you just created so the OLT knows how to route management traffic.
3. ONU/ONT Authentication and Registration
Step 1: Configure GPON Ports
Each GPON port represents a fiber interface that connects to multiple ONUs through splitters. Enabling and tuning these ports is fundamental to network stability.
Key parameters include:
Administrative status (enable/disable port)
Optical power thresholds for alarms
DBA (Dynamic Bandwidth Allocation) profile binding
At this stage, you should also verify optical conditions. If transmit or receive power levels fall outside recommended ranges, ONUs may frequently disconnect or fail to register. Proper optical calibration ensures consistent signal quality across all subscribers.

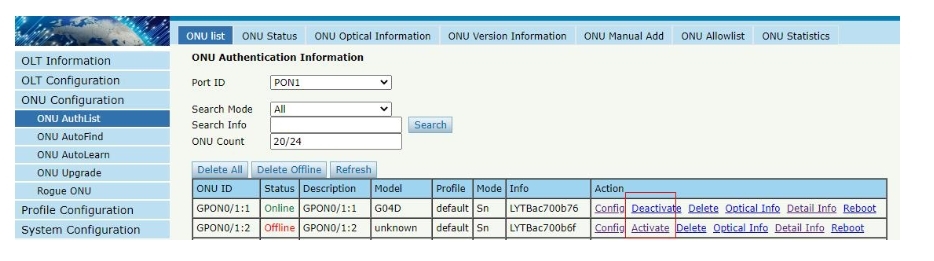
Step 2: Register the ONT
You need to manually add the ONT’s serial number (find it on the device label or packaging) and assign it a unique ONT ID number between 1 and 128 on that PON port.
Explanation: The number 1 after ont add is the ONT ID you are assigning. This ID must be unique per PON port, meaning you cannot have two ONTs with ID 1 on the same GPON interface. The serial number 485754435B4A5C6D is just an example; you will replace this with the actual serial number printed on your ONT. Once this command is entered, the OLT will begin sending discovery messages specifically looking for that serial number.

Step 3: Verify Status
Check whether the ONT has successfully synchronized and registered with the OLT. A healthy registration will show a status such as “Ready” or “Active” (vendor dependent). If the status shows “Ready,” it means the physical layer has synchronized successfully—the ONT is receiving light and has locked onto the OLT’s downstream signal. If the status remains “Offline” or “Dying Gasp,” you should check the fiber connection, splitter, or power supply at the customer premises.
4. Service Provisioning (VLANs & Bandwidth)
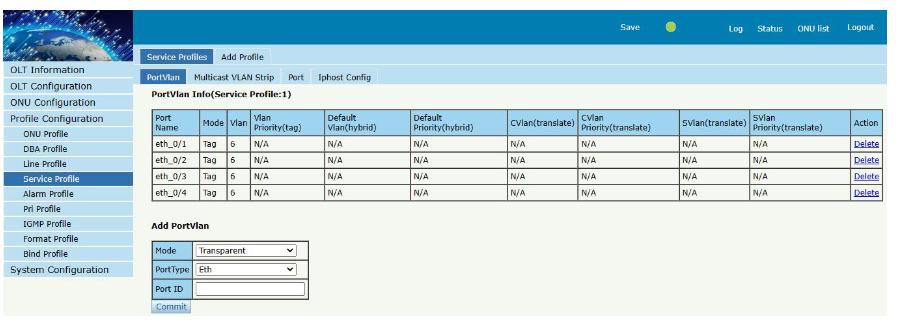
Step 1. Configure VLAN and Service Ports
VLAN configuration determines how traffic is separated and routed across the network. Each service is typically assigned a unique VLAN ID.
Typical setup:
Internet → VLAN 100
IPTV → VLAN 200
VoIP → VLAN 300
This mapping connects user traffic from the ONU to the correct upstream service. Proper VLAN planning avoids traffic overlap and simplifies network management. It also allows operators to apply different policies to each service type.
Step 2. Configure Traffic Profiles and QoS
QoS (Quality of Service) ensures that critical services receive priority over less sensitive traffic. Without QoS, high-bandwidth applications can degrade performance for all users.
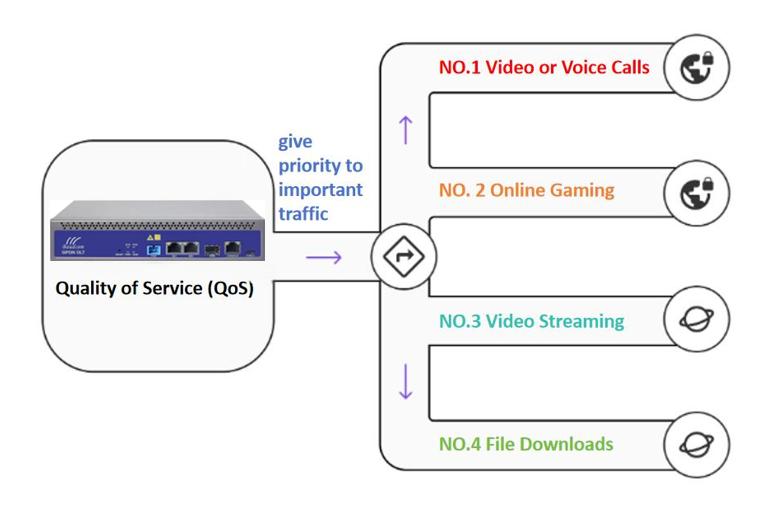
Key parameters include:
CIR (Committed Information Rate): Guaranteed bandwidth
PIR (Peak Information Rate): Maximum allowable bandwidth
Traffic shaping and policing
For example, VoIP requires low latency and should always be prioritized, while general internet traffic can be treated as best-effort. Proper QoS configuration ensures consistent user experience even during peak usage.
Step 3. Assign IP and Enable Services
After defining traffic flow, you must configure how users obtain IP connectivity.
Common methods:
PPPoE: Widely used by ISPs for authentication and billing
DHCP (IPoE): Simpler and faster deployment
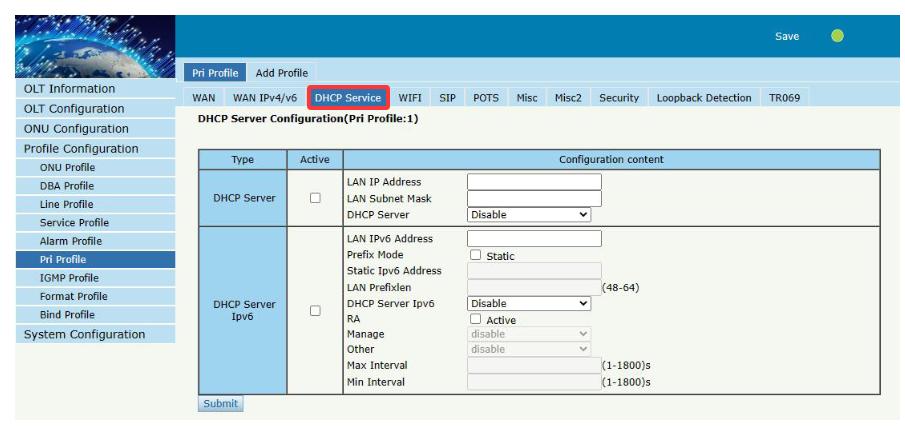
Static IP: Used for enterprise customers
Choosing the right method depends on your network architecture. PPPoE provides strong control over user sessions, while DHCP simplifies deployment and reduces overhead.
Common Issues and Troubleshooting Tips
ONU Not Registering
This issue often occurs due to incorrect SN/LOID configuration or weak optical signals. Always verify both logical settings and physical fiber connections.
No Internet Access
If the ONU is online but users cannot access the internet, the problem is usually related to VLAN mapping or service-port configuration. Double-check these settings carefully.
Slow Speed
Performance issues are typically caused by incorrect DBA profiles, insufficient uplink capacity, or improper QoS settings. Analyzing traffic patterns can help identify the root cause.
Conclusion
Learning how to configure GPON OLT devices does not have to be intimidating. Across all major vendors—whether you are working with Huawei, ZTE, Nokia, VSOL, Zyxel, or TP-Link—the universal logic remains consistent–GPON OLT Configuration Step by Step–Set up secure management access first, then register each ONT by its serial number, then push the appropriate VLANs for each service, and finally apply quality controls like DBA and encryption. While the specific CLI syntax varies slightly between brands, the foundational concepts of authentication, DBA profiles, and VLAN tagging remain constant across the entire GPON industry.
Take your time during the initial console setup phase, because rushing through it often leads to missed steps like forgetting to save the configuration. With this extended guide in hand, you are now ready to deploy a robust, secure, and high-performance GPON network.


