
Setting up a fiber optic network may sound difficult, but it becomes much easier when you understand the basic ideas. The OLT, or optical line terminal, is one of the most crucial components of a fiber optic network. The OLT functions similarly to the network’s brain. It connects the internet from your service provider to many end users through fiber optic cables. The OLT controls how data is sent and received and makes sure that each customer gets the correct service.
If you buy an OLT from a supplier, they usually give you a setup guide or a document with all the commands needed to configure it. But just knowing the commands is not enough. It is also important to understand what each part of the setup means and why it is necessary. In this blog, we will explain the most important things you should know when setting up an OLT. We will use simple words and easy-to-understand examples to help you get started, even if you are new to this technology.

What is an OLT and Why Is OLT setup Important?
An OLT is a hardware device used in fiber optic networks like GPON or EPON. It is placed in a central location, such as an equipment room or data center. The OLT connects to the internet on one side and sends data to many end users on the other side. These end users have devices called ONUs or ONTs (Optical Network Units or Terminals) in their homes or offices.
The OLT manages communication between the internet and the ONUs. It controls download and upload speeds, assigns IP addresses, and separates different services like internet, IPTV, and voice calls. Without the OLT, the entire passive optical network (PON) system would not work.
OLT setup is important because it ensures the network runs efficiently and reliably. A properly configured OLT can balance bandwidth across many users, avoid service interruptions, and provide smooth access to internet, voice, and video services. If the OLT is not set up correctly, users may experience slow connections, lost data, or no service at all. Therefore, understanding how the OLT works and making sure it is configured properly is essential for any fiber network provider or operator.
What You Need to Get Started

Before you begin configuring the OLT setup, you need to prepare a few things:
- Make sure the OLT is powered on and connected properly.
- Prepare a minimum of one ONT or ONU device for testing.
- Use a console cable or Ethernet cable to connect your computer to the OLT.
- Gather information about your network, such as IP address ranges, VLAN IDs, and the model of ONUs you will use.
- Have at least one ONU or ONT device ready for testing.
Once everything is ready, you can connect to the OLT using your terminal software and log in with the default username and password, which is usually provided by the supplier.
How to Configure OLT: step by step
Every OLT needs to be configured before it can start working in your network. Although the actual commands may be different for each brand or model, the basic steps are often the same. Below is a simple explanation of what usually needs to be done:
First, you log in to the OLT. This is done by connecting your computer to the OLT using a cable and opening terminal software. After logging in, it is helpful to set the OLT’s name and time zone. This makes it easier to manage and understand logs in the future.
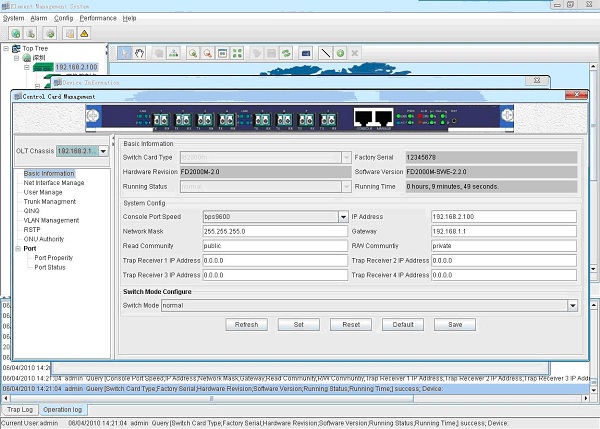
Next, you should assign a management IP address. This is a fixed IP address that allows you to access the OLT from your network, without having to connect with a cable every time. It makes remote monitoring and updates easier.
Then, you configure the uplink ports. These ports are used to connect the OLT to your router or core switch. You will need to decide if you want the port to carry a single type of traffic (access mode) or multiple services (trunk mode). This depends on the services you plan to offer to your users.
Activate the PON ports
These ports send data to the end users through fiber optic cables and splitters. You need to make sure the correct PON ports are enabled and linked to the right VLANs and services.
Now, it is time to set up VLANs. VLANs (Virtual Local Area Networks) are used to separate different types of data traffic. For example, you can use VLAN 100 for internet service and VLAN 200 for IPTV. This keeps the network clean and prevents problems.
Then, you register and bind the ONUs. Each ONU has a unique serial number. When the ONU is connected, the OLT can detect it. You must manually register the ONU and assign it to a PON port and service profile.
Finally, you create service profiles. These profiles control how much bandwidth the user gets, what services they can use, and which VLAN they belong to. After applying the profile to the registered ONU, the user can start using the service.
Do not forget to save your configuration. If you do not save it, the settings may disappear if the OLT restarts or loses power.
Things You Should Know Before Configuring an OLT

How to Access the OLT
You connect your PC to the OLT using a console or Ethernet cable before OLT setup. Then, you open a terminal program to log in. Make use of the supplier’s default username and password. After logging in, you can begin configuration.
What is the Management IP Address?
This is the IP address you assign to the OLT so that you can manage it through the network. It should be unique and part of your local network’s range. Once set, you can manage the OLT from a web browser or terminal software without needing to be physically next to it.
Understanding Uplink Ports
These ports allow the OLT to be directly connected to the internet or to the center of your network. They are important because they carry all the internet traffic to and from the end users. You can configure the port to allow one or many VLANs depending on your network setup.
The Role of PON Ports
PON ports connect to the fiber splitters and eventually reach the ONUs. Each PON port can support many users, often up to 64 or more. These ports must be properly activated and connected to the right service settings.
How VLANs Are Used in OLT
VLANs help keep your network organized. They separate traffic by service type. For example, internet traffic goes on one VLAN, and IPTV on another. This helps improve performance and security.
How to Register and Bind an ONU
When you connect an ONU to the network, the OLT can detect its serial number. You need to register this number and link it to the correct port and VLAN. This process tells the OLT which ONU belongs to which user.
Understanding Service Profiles
Service profiles define what the ONU can do. For example, one user might get 100 Mbps internet, while another gets 50 Mbps plus IPTV. The profile includes these settings, and you apply it when registering the ONU.
Why Saving Configuration Is Important
Most OLTs do not save changes automatically. If the device restarts without saving the configuration, all your settings may be lost. That’s why saving the setup is an important final step.
Conclusion
Knowing how to configure an OLT and understanding how it works can help you avoid problems, save time, and manage your network better. Even if your supplier provides all the commands, having a clear understanding of the setup process allows you to plan better and communicate more effectively with technicians.
If you need help selecting an OLT, designing your fiber network, or performing a custom configuration, the Baudcom team is ready to assist you with expert advice and support.
Keep Learning
Optical Line Terminal (OLT) The Ultimate Guide


