
When it comes to fiber optic splicing, veteran technicians know that the best tool isn’t always the one in the official toolkit. In the field, conditions can be unpredictable, equipment can fail, and time is often of the essence. That’s when experienced techs rely on creative, hands-on modifications and DIY fixes that keep splicing on track. Whether you’re facing a tight deadline or working in less-than-ideal conditions, these unconventional field mods can make all the difference.
In this blog, we’ll explore some of the clever field mods and DIY fixes that experienced splicer repair professionals use to solve common challenges and ensure a successful splice, even when things don’t go according to plan.
Phase 1: Splicer Preparation & Cleaning Hacks
Before splicing begins, ensuring your equipment and fiber are clean and calibrated is critical. Here’s how pros handle common prep-phase failures.
1. The “V-Groove Resurrection Kit”
The Problem: A single grain of sand or hardened adhesive renders a V-groove useless. Official cleaning tools can’t always dig it out.
The Veteran Fix: A curated set of unconventional tools:
Bamboo Sushi Picks or Toothpicks: Softer than ceramic, they won’t scratch the groove but can dislodge debris. The fibrous tip grabs tiny particles.
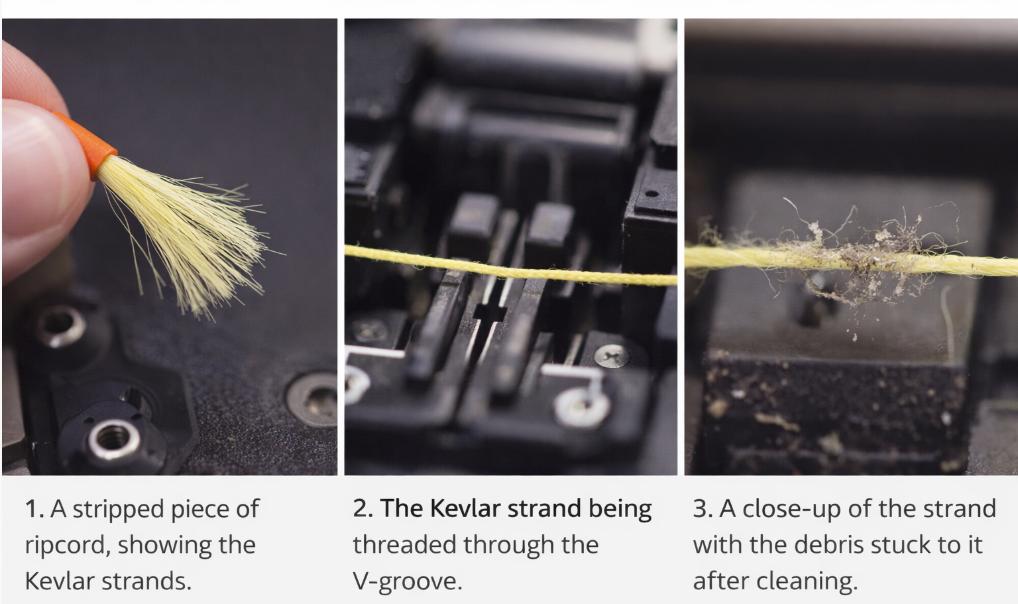
Stripped Kevlar (from ripcord): Folded and drawn through the groove like dental floss. Its high tensile strength and stiffness make it perfect for scraping.
Hand Sanitizer Gel: A tiny drop (non-abrasive, evaporates quickly) on the pick can help dissolve sticky residue without leaving a film. Never use alcohol-based liquids near motors/electronics freely.
2. Electrode Life Extension Hacks
The Problem: New electrodes are expensive and you’re 100 miles from the warehouse. The splicer is throwing “Replace Electrodes” errors, but the splice loss is still acceptable.
The Veteran Fix:
The Precision Rotate: Carefully remove electrodes and rotate them 180 degrees in their holders. The arc often erodes one face more than the other. This presents a fresh surface to the fiber, often buying another 100-200 splices.
3. Environmental Defenders (Dust, Wind, Cold)
The Problem: Wind causes bubbles, dust ruins cleaves, cold drains batteries and slows motors.
The Veteran Fix:
The “Splicer Tent”: A clear 1-gallon zip-top bag. Slide the splicer inside, seal it 90%, feed fibers through the opening, and splice. It creates a still-air, dust-free micro-environment. For wind, tape the bag’s opening around the fiber jackets.
Battery Buddy System: Keep a hand warmer in the splicer’s carrying case, strapped to the battery compartment with a rubber band. In extreme cold, this can keep battery chemistry active enough to finish the job.
Fiber Pre-Warming: On frozen fiber, the coating is brittle. Use your body heat—place the stripped fiber section under your armpit for 60 seconds before cleaving for a more consistent result.
Phase 2: Splicer repair Operation & Alignment Fixes
Once you’re set up, maintaining precision during splicing is the next challenge. These improvised tools help stabilize and secure fiber in less-than-ideal conditions.
1. Magnetic Cable Holders: A Hands-Free Fix
Holding fiber optic cables steady during splicing can be one of the most challenging parts of the job. In tight spaces or when working solo, it can feel impossible to keep everything perfectly aligned.
DIY Fix: Use magnetic holders to keep the fiber in place. Small magnets can be attached to the fusion splicer or custom mounts to ensure the fibers stay steady during the splicing process.
Why It Works: Magnets provide an easy and hands-free way to keep fibers in alignment, especially in difficult-to-reach or cramped spaces.
Tech Tip: Magnets work wonders in outdoor environments or on poles, where managing cables by hand might not be an option. They’re also great when you’re working alone and don’t have a second person to help stabilize the fiber.
2. Using Electrical Tape as a Temporary Fiber Holder
In field splicing, it’s often difficult to keep fibers in place while prepping them for fusion splicing.
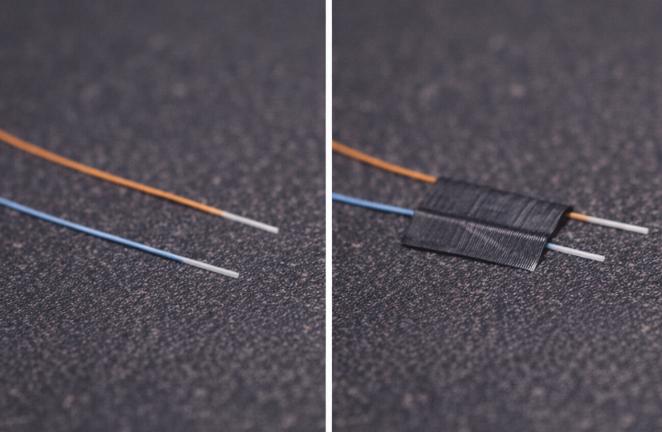
DIY Fix: Use electrical tape to temporarily hold fibers in place on a flat surface. Simply tape the fibers down before insertion into the splicer.
Why It Works: Electrical tape is a quick, simple, and cheap way to secure fibers while prepping them for splicing. It prevents fibers from shifting out of alignment and ensures better splice quality.
Tech Tip: Electrical tape is a quick and effective solution when working in cramped spaces, or when you need to prepare multiple fibers at once.
3. Paperclip Cable Tensioner
Maintaining consistent tension on fiber optic cables during splicing is essential to avoid fiber movement, but dedicated tensioning tools can be bulky or unavailable in some situations.
DIY Fix: Use a paperclip to create a makeshift cable tensioner. Simply bend the paperclip into a small hook to provide adjustable tension on the fiber.
Why It Works: A paperclip offers a lightweight and flexible solution for keeping cables taut while splicing, preventing slack from affecting splice quality.
Tech Tip: Perfect for situations where you don’t have a dedicated tensioner. It’s a low-cost and effective fix that ensures precision during splicing.
Phase 3: Cleaver Maintenance & Calibration
A perfect cleave is non-negotiable. When your cleaver acts up, these salvage techniques can restore performance.
1. Cleaver Calibration & Salvage
The Problem: The cleaver blade seems dull, but the replacement blade is missing or the anvil is dirty.
The Veteran Fix:
The “Blade Flip”: Many cleaver blades are double-edged. Opening the assembly and flipping the blade can provide a fresh, sharp edge.
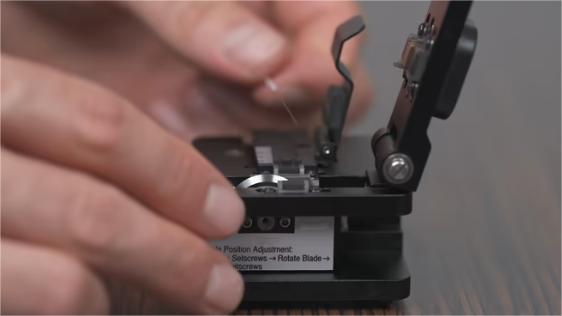
Anvil Resurfacing: The rubber anvil gets nicked. Use ultra-fine grit sandpaper (800+ grit) laid on a perfectly flat surface (a phone screen protector sheet works). Gently sand the anvil in a circular motion to create a fresh, uniform surface. This is a temporary fix but can save a day.
The Sharpie Test: Draw on the fiber with a fine-tip Sharpie before cleaving. If the cleave is good, the ink line will be perfectly sheared. If it smears or fractures, your cleave angle is off—time to investigate blade, anvil, or pressure.
2. Hot Glue for Cleave Protectors
Cleaving fiber optic cables can be a delicate task, and cleave protectors are essential for keeping the fiber clean and free of damage. But in the field, it’s easy to lose them or accidentally damage them.
DIY Fix: Use hot glue to temporarily secure cleave protectors on the fiber ends. Apply a small amount of glue to the protector, allowing it to stay in place during the splicing process.
Why It Works: Hot glue is a fast, cost-effective solution that keeps cleave protectors in place, preventing fiber misalignment or contamination during the splice.
Tech Tip: Make sure the glue is removed before inserting the fiber into the splicer. You want to ensure a clean, secure connection once the splice is complete.
Fix It, But Don’t Break It Worse
Every one of these fixes comes with a silent, serious disclaimer: This is fieldcraft, not best practice. They are born of necessity, perfected through experience, and used with a deep understanding of the risk/reward calculus. They keep networks online when the rulebook has already been tossed out the truck window.
With the right mindset and a few creative tricks up your sleeve, you’ll be able to tackle any splicing challenge that comes your way—and finish the job with confidence, every time. Remember, the best techs don’t just rely on their toolkit—they rely on their ingenuity.


